 Save
Save My grandfather would stand at the kitchen counter with his sleeves rolled up, methodically shaping each kibbeh with the precision of someone who'd done it a thousand times. I was maybe eight, watching his weathered hands work the bulgur and meat mixture, and I remember thinking it looked like magic—how he'd take a small ball and transform it into something so beautiful and perfectly sealed. Now when I make kibbeh, I can almost hear him humming that old tune, and I realize he was teaching me more than just technique; he was passing down a conversation between his hands and the food.
I brought a batch to a potluck once, nervous and unsure, only to watch them disappear in minutes while someone asked for the recipe with their mouth still full. That's when it clicked for me—this isn't just food, it's the kind of thing that gets people talking, that brings everyone to the table. My Lebanese friend tasted one and nodded slowly, then smiled, and somehow that meant everything.
Ingredients
- Fine bulgur wheat: Soak it gently—it should be soft but still hold its grain structure, almost like it's just waking up from a nap.
- Ground beef or lamb: Lean meat is your friend here; it keeps the kibbeh from becoming greasy, and the spices sing without competing with fat.
- Onion (for dough): Finely chopped and raw, it adds a subtle sharpness that balances all those warm spices.
- Allspice and cinnamon: These two are the soul of kibbeh—they create that warm, recognizable flavor that tells you this is something special.
- Black pepper: Don't shy away from it; it's the quiet voice that makes everything else taste more like itself.
- Ground beef or lamb (for filling): Cook it slowly so every grain browns evenly, which means maximum flavor in every bite.
- Pine nuts: Toast them carefully until they're golden—burned pine nuts taste bitter and will haunt you, I promise.
- Olive oil (for filling): Use good olive oil here; it carries the flavor of the onions and spices into the meat beautifully.
- Vegetable oil (for frying): Keep it at 180°C exactly; too cool and the kibbeh absorbs oil like a sponge, too hot and the outside burns before the inside cooks.
- Olive oil (for brushing): If you're baking, this creates that crispy finish without deep-frying.
Tired of Takeout? 🥡
Get 10 meals you can make faster than delivery arrives. Seriously.
One email. No spam. Unsubscribe anytime.
Instructions
- Wake up the bulgur:
- Rinse it under cold water until the water runs clear, then let it sit for 10 minutes. You'll feel it soften between your fingers, becoming almost cloud-like. This step is non-negotiable—it's the difference between kibbeh that holds together and dough that falls apart in the oil.
- Build your base:
- In a large bowl, combine the softened bulgur, ground meat, finely chopped onion, and all the spices. Knead it like you're making bread, adding cold water a tablespoon at a time until the mixture becomes smooth and holds together without being wet. It should feel almost like soft clay in your hands.
- Make the treasure:
- Heat olive oil in a skillet and soften the onions slowly—rushing this step means they won't caramelize and sweeten properly. Add the ground meat and let it brown without stirring too much; you want it to develop color and flavor. Stir in the pine nuts at the end and watch them turn golden; this happens quickly, so stay close.
- Cool and taste:
- Remove the filling from heat and let it cool slightly. Taste it and adjust the seasoning—this is your only chance to get it right before it goes inside the kibbeh.
- Shape with intention:
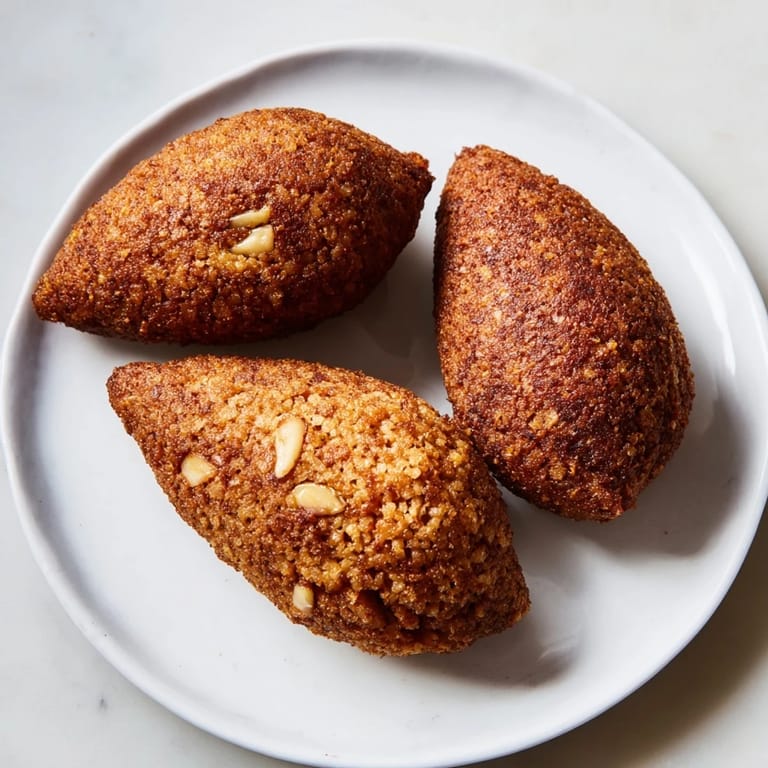
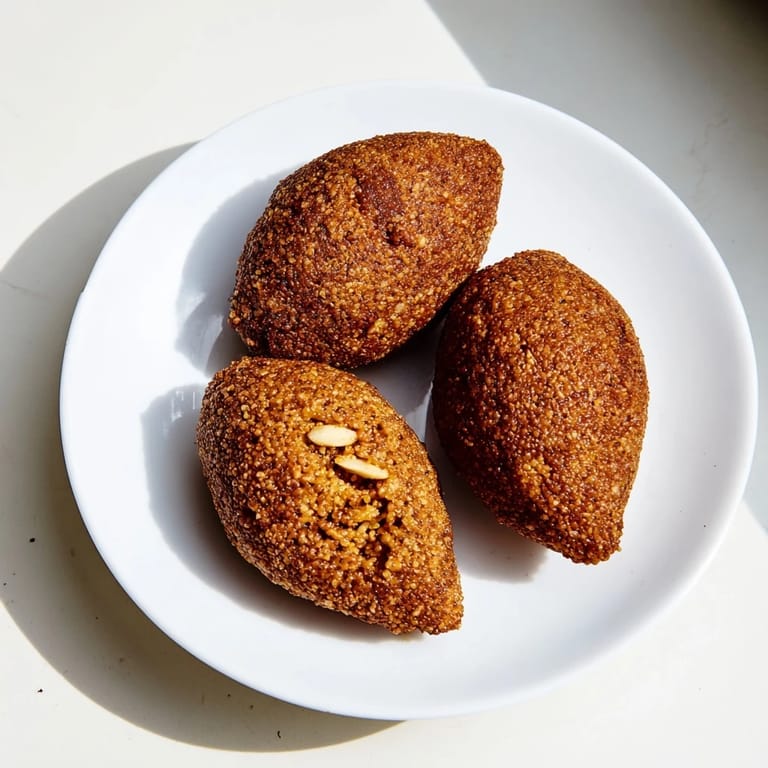
- Wet your hands so the dough doesn't stick, take a piece about the size of a golf ball, and flatten it into a thin oval shell in your palm. The shell should be thin enough that you can almost see through it—this creates that tender crispness you're after. Place a teaspoon of filling in the center, then pinch and seal the edges, shaping it into a torpedo or football shape. If you're nervous, practice the first one slowly; it only takes a few to find your rhythm.
- The final test (frying):
- Heat vegetable oil to exactly 180°C—use a thermometer, not guesses. Fry the kibbeh in batches for 4 to 5 minutes until they're deep golden brown, turning them halfway through so both sides crisp evenly. Drain them on paper towels, and resist eating the first one for at least 30 seconds (okay, maybe 5).
- The gentle way (baking):
- Preheat your oven to 200°C, arrange the kibbeh on a parchment-lined baking sheet, brush them lightly with olive oil, and bake for 25 to 30 minutes, turning them halfway through. They won't be quite as shattery as fried ones, but they'll still be wonderful and far less guilty to eat.
 Save
Save There was a moment, maybe the third time I made these, when I finally understood why my grandfather smiled while shaping them. It wasn't just about feeding people; it was about creating something with your hands that felt like art and tasted like home. Every kibbeh is a small, golden promise.
The Oil Temperature Matters More Than You Think
I learned this the hard way by guessing, and my first batch came out looking more like sponges than croquettes. The oil needs to be hot enough to create an instant, sealed golden crust that locks in the filling and keeps the inside tender. If you don't have a thermometer, heat the oil until a tiny piece of dough sizzles immediately but doesn't burn the moment it touches the pan. It's a feel you develop, but a thermometer takes the guesswork out and guarantees success.
Serving and Storage Secrets
Kibbeh tastes best when it's still warm and the exterior is still crispy, so serve it straight from the pan if you can. Cool it even a little and it becomes just good instead of unforgettable. For storage, let them cool completely, then refrigerate in an airtight container for up to three days, or freeze for up to three months before cooking. Frozen kibbeh can go straight into hot oil without thawing—just add a minute or so to the cooking time.
Variations and Accompaniments
Once you master the basic recipe, you can play. Some versions use a half-and-half mix of meat and cooked lentils for the filling, which makes them richer and more complex. Others add a hint of pomegranate molasses to the filling for brightness. The vegetarian version with sautéed mushrooms and lentils is genuinely special—it doesn't try to be meat; it becomes something in its own right. Serve kibbeh with a cooling yogurt or tahini sauce, a crisp salad with fresh lemon, and warm pita bread. These components are essential because they balance the richness and add freshness that makes you want another one immediately.
- A dollop of thick yogurt spiked with garlic and a pinch of salt is the perfect counterpoint to the warm spices.
- Try making a quick tahini sauce with lemon juice, garlic, and water—it's lighter and brings out different notes in the kibbeh.
- A side salad with parsley, tomatoes, and red onion in lemon and olive oil is not optional; it's the reason kibbeh tastes even better.
 Save
Save Make these for people you love, and watch their faces light up when they taste that first golden bite. That moment is what this recipe is really about.
Questions & Answers
- → What is kibbeh made of?
Kibbeh consists of finely soaked bulgur wheat combined with spiced ground beef or lamb to create a dough, filled with a meat mixture including onions and pine nuts.
- → How is kibbeh cooked?
Kibbeh can be deep-fried in vegetable oil until golden brown or baked in the oven brushed with olive oil for a crisper finish with less fat.
- → Can kibbeh be prepared vegetarian?
Yes, replacing the meat filling with cooked lentils and sautéed mushrooms offers a flavorful vegetarian alternative.
- → What spices are used in kibbeh?
Typical spices include ground allspice, cinnamon, black pepper, and salt, which provide a warm and aromatic flavor profile.
- → How should kibbeh be served?
Kibbeh is traditionally enjoyed with yogurt or tahini sauce and a fresh salad, balancing the richness of the croquettes.
- → Can kibbeh be frozen before cooking?
Yes, kibbeh can be frozen uncooked for up to three months, ideal for meal prep and convenience.