 Save
Save The first time I made these crispy rice bites, I was trying to recreate something I'd tasted at a sushi bar years ago—that addictive combination of warm, salty crunch and cool, spicy tuna on top. My kitchen filled with the smell of rice vinegar and hot oil, and I remember thinking halfway through frying that I'd somehow stumbled onto the perfect party food. Friends kept reaching for just one more, and before I knew it, the entire tray had disappeared. Now whenever I want to impress someone without spending hours in the kitchen, these are my go-to.
I made these for a dinner party on a cold winter night, and I'll never forget how quiet the room got the moment people tasted them. It was that good kind of quiet—the kind where everyone's too busy enjoying themselves to talk. My best friend asked for the recipe on the spot, which is basically the highest compliment in my book.
Ingredients
- Sushi rice: The foundation of these bites—it needs to be rinsed thoroughly and seasoned with vinegar, sugar, and salt to get that perfect balance of sticky and flavorful.
- Rice vinegar, sugar, salt: These three work together to season the rice just right; the warmth helps them dissolve in, so the flavor soaks in evenly.
- Vegetable oil: Use a neutral oil with a high smoke point so the rice stays golden and crispy without tasting greasy.
- Sushi-grade tuna: This is non-negotiable—buy from a trusted fishmonger who handles sushi-grade fish, and use it the same day for safety and best flavor.
- Kewpie mayonnaise: It's creamier and richer than regular mayo, which makes the spicy tuna mixture feel luxurious without any effort.
- Sriracha: This gives the tuna its signature kick, but use what you like—more if you love heat, less if you prefer mild.
- Sesame oil: A small amount adds a toasty, authentic flavor that you really can't replicate with anything else.
- Green onion and sesame seeds: These are the finishing touches that add texture and a fresh, bright note to each bite.
- Avocado: Creamy and cool, it balances the heat and adds a silky richness that makes everything better.
Tired of Takeout? 🥡
Get 10 meals you can make faster than delivery arrives. Seriously.
One email. No spam. Unsubscribe anytime.
Instructions
- Rinse and cook the rice:
- Run the sushi rice under cold water, stirring gently with your fingers, until the water comes out clear—this removes excess starch so the rice stays separate and doesn't clump. Bring the water and rice to a boil, then cover, drop the heat to low, and let it steam undisturbed for 15 minutes.
- Season while warm:
- Warm the vinegar mixture in the microwave for just 20 seconds so it dissolves completely, then fold it gently into the hot rice with a wooden spoon—folding keeps the grains intact instead of breaking them up. Let it cool all the way down to room temperature so it's ready to press into the pan.
- Press and chill:
- Line your pan with plastic wrap, press the cooled rice in firmly and evenly, then refrigerate for at least an hour—this helps it hold together when you fry it. If you have time, overnight is even better because the rice becomes more compact and extra crispy.
- Mix the tuna:
- Combine your diced tuna with mayo, Sriracha, soy sauce, sesame oil, and green onion in a bowl, stirring gently so the tuna stays in nice pieces. Taste it and adjust the heat or saltiness to your liking, then refrigerate until you're ready to assemble.
- Cut and fry:
- Lift the rice slab out of the pan, cut it into 16 squares, then heat your oil until it shimmers and fry the pieces in batches so they have room to get golden and crispy on both sides. Drain them on paper towels for a minute so they lose the excess oil but stay warm and crunchy.
- Assemble and serve:
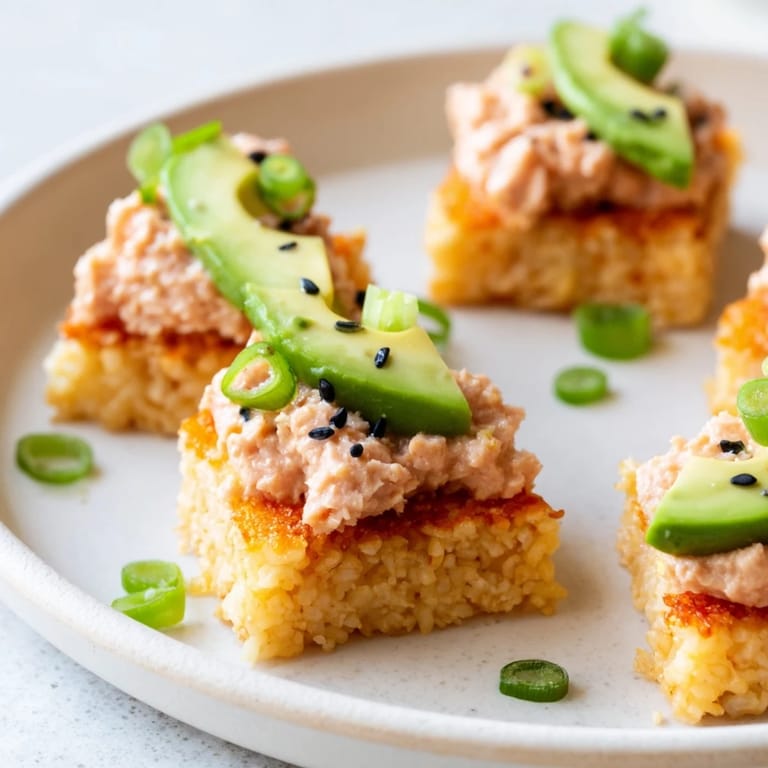
- Top each warm rice square with a generous spoonful of spicy tuna, add a piece of avocado, then sprinkle with black sesame seeds and green onion if you've got them. Serve right away while the rice is still crispy and the tuna is cool enough to contrast with the warmth.
 Save
Save There was a moment last spring when my neighbor stopped by unexpectedly and I pulled out the last of these from the fridge. Watching someone who'd never tried them before take that first bite and light up—that's when I realized these little bites had become more than just an appetizer. They're my way of saying hello, or welcome, or I'm glad you're here.
Timing and Prep Strategy
The beauty of this recipe is that you can break it into steps across a day or two. Make the rice and press it into the pan the morning of your event, then assemble everything else right before people arrive. The spicy tuna mixture actually gets better as it sits for a few hours because the flavors meld together, and the avocado stays fresher if you slice it just before serving. I usually fry the rice squares about 15 minutes before guests show up so they're still warm and crispy when everyone gathers around the table.
Flavor Customization
Once you master the basic technique, this recipe is a playground for your own tastes. I've made versions with a spicy mayo that's lighter on the Sriracha for people who don't love heat, and I've also gone the opposite direction with extra heat and a touch of wasabi for friends who like to feel the burn. The rice stays the same, but the topping is yours to play with—salmon, cooked crab, or even cooked shrimp work beautifully in place of tuna, and you can swap the avocado for a thin slice of cucumber if someone prefers something lighter and more refreshing.
Serving Ideas and Pairings
These are perfect on their own as an appetizer, but I love serving them alongside a cold sake or a crisp white wine that cuts through the richness of the mayo and the heat of the Sriracha. Set out small bowls of soy sauce, pickled ginger, and wasabi on the side so everyone can customize their own experience—some people like a dab of extra heat, others prefer the vinegary punch of the pickled ginger. I've also served them at casual cocktail parties with nothing but napkins nearby, and they disappeared so fast that I'm now always in the habit of making extra.
- Serve these within 30 minutes of frying so the rice stays at its crispiest.
- If you're making them ahead, fry the rice first, then keep it at room temperature and assemble just before serving.
- Set out small plates and napkins because these are meant to be eaten with your hands, and they're too good not to be a little messy.
 Save
Save These crispy rice bites have become my answer to the question of what to bring when I want to show up and impress without fussing all day. They remind me that some of the best food is simple, honest, and built on a technique you can master once and use forever.
Questions & Answers
- → What type of rice is best for crispy rice squares?
Use sushi rice for its sticky texture that holds together well when fried, ensuring crispy yet tender squares.
- → Can I prepare the rice mixture in advance?
Yes, pressing and chilling the rice for at least an hour helps firm it up, and even overnight chilling enhances the crispiness when fried.
- → What kind of tuna should be used?
Sashimi-grade tuna is recommended for freshness and safety, providing the best taste and texture.
- → How can I adjust the spiciness level?
Modify the amount of Sriracha or omit it entirely to control the heat in the tuna mixture according to your preference.
- → Are there vegetarian alternatives for the topping?
Yes, consider substituting with chopped salmon, cooked crab, or even avocado alone for a different flavor profile.
- → How should the crispy rice squares be served?
Serve immediately after topping with the tuna and avocado to maintain the crisp texture and fresh flavors.